australian-period-home-front-deck-fence
How to style your home for sale on a budget
Phyllis, October
2015
You’ll never get a second chance to make a great first impression. So says the maxim, and it’s especially true when it comes to preparing a house for sale. That’s why it’s important to dress your home to impress from the moment potential buyers walk through the front gate all the way to the back fence and everything in between.
As a result, more and more people are calling in stylists in attempt to woo and wow everyone who walks through the door. But if, like me, you can’t afford to hire someone to advise you what furniture and accessories to buy (let alone spend a small fortune hitting the shops) and you’re not confident about your fashion” eye”, there are ways to style your home with free professional advice and minimal outlay.
[caption id="attachment_3042" align="alignleft" width="690"] Living it up in style[/caption]
 From drab ...[/caption]
The answer wasn’t on a website this time. It was in a trip to a couple of homemaker stores. It was the help that I got from their staff that made me write this story. Here was the professional advice I couldn’t afford - for free. I live in Penrith is Sydney’s west, so my local Adairs was my first port of call. TOP TIP: Take some pictures of your rooms on your phone so you can show the staff exactly what you’re working with.
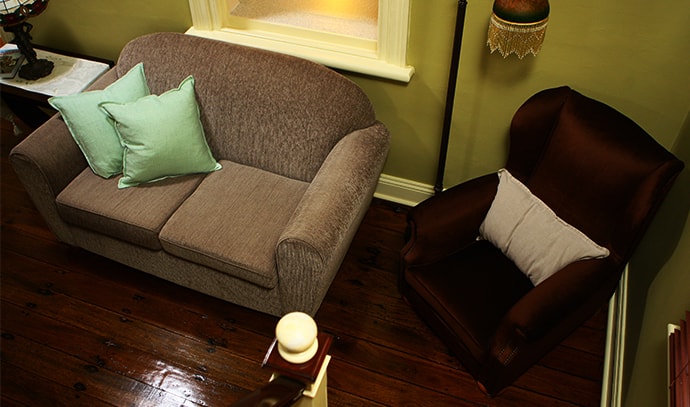
The young girl who served me was brilliant. After my rambling explanation of what I needed to achieve, I produced my phone. Olive green living room with mid-brown sofa and chocolate brown armchair? Not a problem. She suggested a couple of light green square linen cushions for the sofa and a light brown rectangular one for the armchair. “What about a throw?” I asked. “No, I think you’ll overdo it,” came the reply. She then showed me how to place them (overlapping together at one end of the sofa and straight across the seat on the armchair) before we moved onto the bedroom.
[caption id="attachment_3043" align="alignleft" width="690"]
 To fab ...[/caption]
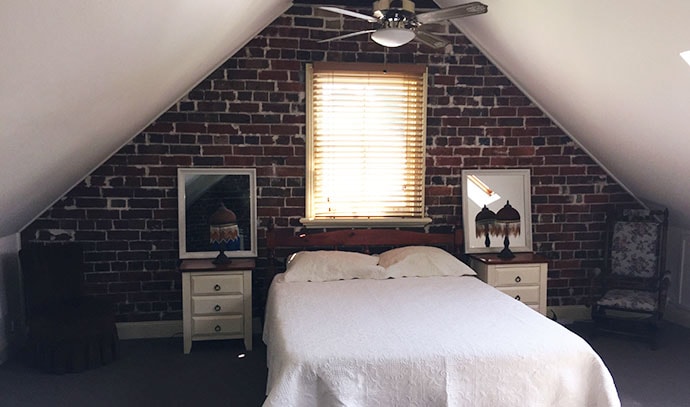
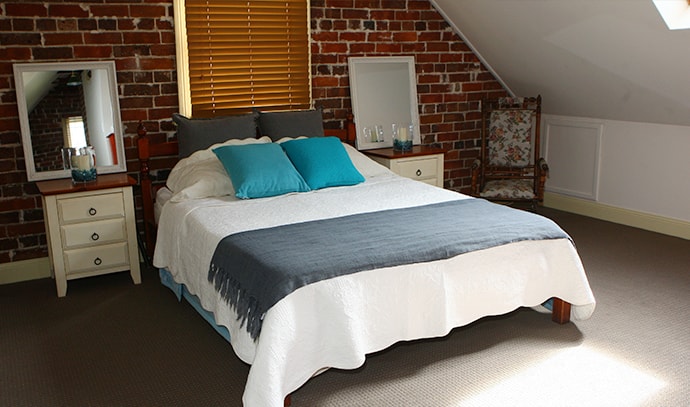
Ah the bedroom. One thing I learned throughout this exercise was the importance of taking pictures of your rooms. They really show up the gaps and any bland spots. And that’s exactly what I saw when I took a picture of the main bedroom. I’d always thought the converted attic looked lovely with its white walls, bare bricks and white coverlet on the bed. Not so. The photo showed a bare and boring room. “Are there any colours in the room?” asked my new advisor. “Err no, just white,” I said. “Then what’s your favourite colour?” “Teal. I’ve always loved it,” I said. Suddenly I had a burst of decorating over-enthusiasm. “What do you think about teal European pillows, teal cushions and a teal throw?” I enthused. My young style guru reined me in. “What do you think about charcoal European pillows behind your white ones and then a single teal cushion in front,” she suggested. “I’ll get a couple for you to look at.”
 Living it up in style[/caption]
Let your fingers do the walking
I’m not talking about the Yellow Pages either. A couple of weeks ago my home was about to go on the market and I wanted to ensure it looked as good as possible for the agents who were about to come through for the first time, the photographer and, of course, potential buyers. The home is Victorian, which will possibly limit the market, so we made a conscious decision not to hide the property’s heritage status but to play on its inherent charm. After all, there’s a lot to be said for owning a period home (read more here). At the same time, I wanted it to look like the kind of home people could see themselves and their children living in. I knew I wanted some outdoor seats for the back verandah, some plates and cups for the table and chairs in the covered entertainment area and accessories for the main bedroom and living room. It was time to hit the “net” and start looking for what was available on the websites of discount department stores. That’s when I discovered how brilliant K-mart’s site is. Now this is no plug for K-mart (I’m usually a Target kinda gal) but the image of an outdoor conversation setting was exactly the look I needed. Not only did I buy the $229 setting (cheaper than anything else I could find) but I bought all the accessories from the photo as well and copied the look on my back verandah. Cheap as chips and I got the same look that was created for the photo shoot by an art director or stylist. Emboldened by my success, I bought some similarly cheap striped plastic picnic plates, coloured cups, placemats, salad bowls, chair pads and a plant pot for the outdoor dining area. A flick through some homemaker magazines gave me the idea of dressing up the area with some glazed pots and plants. Because I’d spent so little on the table accessories, I could afford to indulge in spending the money on some nice pots, while at the same time I picked up some inexpensive plastic ones with a stone texture finish. By mixing the cheap with some slightly more expensive items I created a designer look that didn’t cost the earth.Talk to the free experts
Indoors was another story. The antique side tables, gilt mirror and framed photos of the house and nearby landmarks (some taken more than a century ago) looked great. But the sofa and armchair looked decidedly dull and forlorn. Ditto for the white coverlet on the bed in the white painted master bedroom. Both rooms needed a little lift. But what? Cushions? Throws? And how to arrange them? [caption id="attachment_3044" align="alignleft" width="690"] From drab ...[/caption]
The answer wasn’t on a website this time. It was in a trip to a couple of homemaker stores. It was the help that I got from their staff that made me write this story. Here was the professional advice I couldn’t afford - for free. I live in Penrith is Sydney’s west, so my local Adairs was my first port of call. TOP TIP: Take some pictures of your rooms on your phone so you can show the staff exactly what you’re working with.
The young girl who served me was brilliant. After my rambling explanation of what I needed to achieve, I produced my phone. Olive green living room with mid-brown sofa and chocolate brown armchair? Not a problem. She suggested a couple of light green square linen cushions for the sofa and a light brown rectangular one for the armchair. “What about a throw?” I asked. “No, I think you’ll overdo it,” came the reply. She then showed me how to place them (overlapping together at one end of the sofa and straight across the seat on the armchair) before we moved onto the bedroom.
[caption id="attachment_3043" align="alignleft" width="690"]
 To fab ...[/caption]
Ah the bedroom. One thing I learned throughout this exercise was the importance of taking pictures of your rooms. They really show up the gaps and any bland spots. And that’s exactly what I saw when I took a picture of the main bedroom. I’d always thought the converted attic looked lovely with its white walls, bare bricks and white coverlet on the bed. Not so. The photo showed a bare and boring room. “Are there any colours in the room?” asked my new advisor. “Err no, just white,” I said. “Then what’s your favourite colour?” “Teal. I’ve always loved it,” I said. Suddenly I had a burst of decorating over-enthusiasm. “What do you think about teal European pillows, teal cushions and a teal throw?” I enthused. My young style guru reined me in. “What do you think about charcoal European pillows behind your white ones and then a single teal cushion in front,” she suggested. “I’ll get a couple for you to look at.”
A lesson for all salespeople
By not pushing me to spend too much money, I was happy to spend quite a bit. Not only did I buy the charcoal European pillows, I bought two teal cushions (one knitted, the other soft washed linen) and a charcoal throw to fold across the end of the bed. Just like the beds in the store. (And every display home known to man!) The sales girl showed me how to set it all up on a bed in the store and (ANOTHER TOP TIP) I then took a photo so I could recreate the look at home. The advice I took away was invaluable and gave me other ideas for decorating the bedroom, which is quite large and was still looking at little bare at the top of the staircase and on the chest of drawers next to the (empty) walk-in wardrobe. The next day I went to the My House store in south-west Sydney’s Narellan where I got more free advice from the staff there. Again, I showed pictures on the room and the two areas I wanted to decorate. Again, that helped them guide me towards, not only the right decorator items, but how to display them. Again the woman who served me wasn’t pushy and, again, that made me willing to spend more. She spent ages arranging and rearranging items (and preventing me from overdoing it). I then took pictures on my phone of the final look so I could recreate it at home.The take home lesson
What I gained from speaking to experts in stores rather than hiring one, as well as searching for inspiration on websites that had been styled by art directors, was the confidence to add a few more touches and hopefully decorate my next house. That isn’t to say that professional home stagers aren’t worth the investment. They certainly take a lot of the legwork (and guesswork) out of creating the right look to attract home buyers. But if, like me, it’s beyond your budget, it’s still possible to get professional advice and create a stylish look without spending a fortune.6 tips to create a showstopper
- Take photos to show sales assistants so they know exactly what you’re trying to describe.
- Search store websites for in situ images of rooms or areas put together by professional stylists or art directors.
- Once you have a look in mind, use cheaper items to put it together then add some more expensive key pieces for that added wow factor.
- Ask sales assistants to show you how to put things together while you’re in the store, then take a photo so you can recreate it at home.
- Listen to the experts. People who work in homemaker stores know their stuff and are up to date on the latest looks and how to get them.
- Take more pictures afterwards, so you can use your new-found knowledge to fill in any gaps in your display.


